Sunday, June 19, 2011

Donna Hay's Raspberry Spiked Brownies

My new workplace has this great little morning tea tradition. Every Wednesday the staff in the east wing of the Town Hall take turns cooking something to share with everyone. Two people are rostered on each week and usually one person will do sweet and one will do savoury. I made it very clear when I was first filled in on the workings of it that I could only do sweet!

Last week it was my turn so I thought I'd pull out a new recipe to go along with my apple crumble muffins (I'm told you don't have to cook two things but it's generally ok if that's what you want to do!). When we were on our girls' weekend in Warrnambool a few months ago I got a gorgeous little Donna Hay 'Chocolate' cookbook. I love the food photography that Donna Hay does - the rustic feel of it is just gorgeous. I took a quick look through it and quickly settled on this recipe - I'm sure by now you can understand why!

Donna Hay's Raspberry Spiked Brownies

THE RECIPE
Another quick and easy one! Preheat your oven to 180c. Melt 200g dark chocolate and 250g butter in the microwave, stirring every 40 seconds until melted and smooth.

In a bowl, mix together 4 eggs and 1 3/4 cups brown sugar then add the chocolate mixture. Sift over this 1 1/3 cups plain flour, 1/4 tsp baking powder and 1/3 cup cocoa. Mix to combine.

Pour the mixture into a lined square cake tin and top with 1 1/2 cups raspberries. The raspberries can be fresh or frozen, it doesn't really matter. It feels like a lot of raspberries but do put them all on because they shrink in quite a bit when they're cooked.

Bake for 30-35 minutes. The brownies should be quite fudgy so don't worry if they don't seem completely set. Let them cool completely in the tin before cutting into 16 squares. It's tempting to try and cut them while they're still warm but don't - it gets very messy!

My first offering for the traditional morning tea at work.

Tuesday, June 14, 2011

Two of the best - choc-chip biscuits

A good choc chip biscuit is one of life's simple pleasures. I'll admit that you can get good ones at the supermarket and bakery but there's something about a good homemade biscuit that you can't go past. For me it's getting them out of the oven, carefully transferring them to the rack and then watching them crisp up as they cool. All of that said, it's taken me ages to find a good recipe and I've learnt that you have to watch them like a hawk when you bake them - a couple of minutes too long and you can wreck a whole batch.

So here are two of my favourites - Janelle Bloom's condensed milk choc chip biscuits and Nigella Lawson's totally chocolate chocolate chip cookies.

Janelle Bloom's condensed milk choc-chip biscuits


These ones are from a recipe book I bought my Mum for her birthday one year. We had a bit of a tradition when I was doing uni of sitting down at lunch time and watching Ready, Steady, Cook and Janelle always made the most incredible baked treats and desserts. These biscuits are just one example!

THE RECIPE
Preheat your oven to 180c (170c if using the fan) and line four big baking trays with baking paper - we're making around 40 biscuits here, depending on how much mixture you eat on the way!

Grab your electric mixer and pop into the bowl 250g butter (softened and chopped), 1/2 cup caster sugar  and half a tin of condensed milk. Beat until pale and creamy. Sift 2 1/2 cups plain flour and 3 1/2 tsps baking powder over the top of the butter mixture and mix until just combined. Add 375g choc chips and stir until well distributed.

Roll heaped teaspoons of the mixture into balls and place onto the baking trays, leaving a little bit of room for them to spread. Flatten a little with a fork.

Bake two trays at a time for 9-12 minutes. Stand for five minutes on the trays and then transfer to wire racks to cool.


Nigella Lawson's Totally Chocolate Chocolate Chip Cookies
 ( minus my good camera :(
Ok, so these biscuits right here are the definition of comfort food! You could not possibly get any more chocolate into them if you tried - even I had trouble getting through a whole one in one go (I did manage though - tough gig but someone has to do it). When I saw Nigella making them on her show, she was making them for a girlfriend who had just broken up with her man - like I said, perfect comfort food.

THE RECIPE
Preheat your oven to 170c (remember to lower it a bit if you don't have the option of turning the fan off in your oven - I forgot and had the fan on and they cooked a bit too quickly). Line two large baking trays with baking paper.

Melt 125g dark chocolate in the microwave and set aside to cool a little. Put 150g plain flour, 30g cocoa, 1 tsp bicarb and 1/2 tsp salt into a bowl. Use your electric mixer to cream together 125g butter, 75g brown sugar and 50g white sugar until pale and creamy. Add the melted chocolate and mix to combine. Then add 1 tsp vanilla extract and 1 cold egg. It's interesting that the recipe calls for a cold egg because all good bakers know that all your ingredients should be at room temperature but the lady that taught Nigella this incredible recipe says the egg is to be cold, so cold it is!

Mix in the combined dry ingredients and then finally 350g dark choc chips. Scoop 12 equal mounds onto the trays - one of those ice cream scoops with the release handle works best but I just used my 1/4 cup measure. Don't flatten the mounds.


Place the trays into the oven. It should take around 18 minutes for the biscuits to cook - check them from time to time. You should get some fudgy cake crumbs sticking to the tester but no raw mixture. You'll have to try and avoid the hundreds of choc chips to get an accurate idea!

Remove from the oven, leave to cool on the trays for 5 minutes or so and then transfer to wire racks to cool completely (minus the one that you HAVE to eat while it's still warm - incredible!)

Thursday, May 26, 2011

Nigella's Molten Chocolate Baby Cakes

So Nigella calls these Molten Chocolate Babycakes. The chefs would call them Chocolate Fondants. Some people call them Chocolate Lava Cakes or Soft Centred Chocolate Puddings. Whatever you call these little gems, they have one thing in common - they are incredible!

I'd have to say this is my favourite dessert. The first time I made these, my sister and I talked about them for days. They were so delicious; I think I made them three nights in a row!

So here I go again with my chocolate and raspberry combo. For me, you just can't go past it. It's the bomb. End of story.

THE RECIPE
For something so tasty, these things are fairly easy - I don't do difficult! Start by getting 6 ramekins, greasing them and lining the bottoms with some baking paper. Preheat the oven to 200c. Melt 350g dark chocolate using spurts in the microwave. Nigella says to use the best quality dark chocolate you can get but it can be pretty expensive - I get one block of the good stuff and mix it with the cadbury old gold. Set it aside to cool.

Cream together 50g butter and 150g caster sugar then add 4 large eggs, beating well between each addition. Mix in a pinch of salt and 1 tsp vanilla extract. Add 50g plain flour, mix until smooth and then scrape in the chocolate and mix gently to combine.

Resist the temptation to eat the mixture!

Divide the batter between the ramekins and sit them on a baking tray. Nigella doesn't do it in her recipe, but I learnt somewhere that you should put them in the fridge at this stage for half an hour or so. It helps them to set a bit and hold their form. The whole idea with fondants is that they're still squishy in the middle so putting them in the fridge helps that outer crust to sit a little firmer. From the fridge, pop them into the oven for 10-12 minutes. I sometimes leave them a little longer because I get scared that they won't come out of the moulds properly but if you want a true fondant, 12 minutes will do it!


Now, you can serve them however you want - cream, ice-cream, some mascapone with vanilla would be nice. You know me though... I put some vanilla ice-cream and some raspberries with it! I used to cook the raspberries up with caster sugar and sieve it to make a coulis but now I just pop the raspberries and sugar in the microwave for a minute or so and pour them straight over the top - just as tasty and much less effort!

Enjoy!


P.S - first recipe in my new house! The oven works well :)

Monday, April 25, 2011

Easter Cupcakes

I find Easter really stressful. All the people and the crowds and the existence of traffic in our quiet little town - it's all just a bit much for me! That said, I love that all my friends are home and we all get to catch up with people we haven't seen for a while. Anyway, when my friend Jess organised her usual catch up barbie on Easter Saturday I quickly put my hand up to make something sweet to share. I knew instantly that it would help with the stress levels getting ready to head out on Saturday night - pity it didn't save our night when things got crazy but that's another story!
What would Easter be without some baked chocolatey goodness!?
THE RECIPE 
As usual, it's really easy! I got the recipe from taste.com.au

Preheat the oven to 180c and line two 12 hole muffin tins with paper cases. Melt 200g milk chocolate in the microwave (use one minute zaps, stirring in between with a metal spoon). Using electric beaters or a mixmaster, beat 200g butter and 1 cup caster sugar until pale and creamy. Add 3 eggs one at a time, beating well after each addition. Add the slightly cooled chocolate and mix until combined. Add 1 1/4 cups plain flour, 1/4 cup cocoa, 1 tsp baking powder and 1/2 tsp bicarb soda and mix in using a spatula or wooden spoon (it can get a bit messy if you do this bit in the electric mixer - I get impatient, turn it right up high and end up with flour all over me!). Once that's all mixed in, stir in 1/2 cup milk until combined. Put the mixture into the cases, filling them about two thirds full so that you get a nice even top to ice. Pop them into the oven for about 20 minutes. Keep an eye on them - I had mine in for right on 20 minutes and they were a bit overcooked.

Try and resist the temptation to eat them as is - the frosting makes them even better!
To make the frosting, beat 100g butter with an electric mixer until really pale. Gradually add 1/3 cup cocoa, 3 cups icing sugar and 1/4 milk in batches, beating well between each batch until combined. Spread the frosting over the top of each cake and top with a little Easter egg. And you're done!

Happy Easter!

Wednesday, April 20, 2011

Lemon Shortcake

This is one I've been sitting on for a while, waiting for an excuse to make. I promised Aunty Trace she could choose any cake she wanted for her birthday and this is the one she picked. I was really excited to try it out and very happy with the result!

Happy Birthday, Traco!
Ok, so mine didn't turn out anywhere near as neat as the picture in my book but it still tasted pretty good! Before you set out on this one, be aware that it does need to set overnight so you'll need to start a day in advance.

THE RECIPE
The first step is to cut 8 x 20cm circles out of baking paper (just use a cake tin to trace them out) and preheat your oven to 180c.

Using an electric beater, mix 180g butter at room temperature, 3/4 cup caster sugar, 1 tsp finely grated lemon rind and 1 egg at room temperature until pale and creamy. Sift together 2/3 cup plain flour, 1/4 cup self raising flour and 2 tbsp cornflour and mix gently into the butter mixture. Divide the mixture into 8 eight even portions.

Grab two baking trays and put a baking paper circle on each. Now, this is where it gets tricky! You need to spread a portion of mixture onto each circle. I used my flat icing blade and kept dipping it into warm water to prevent sticking. Make sure the mixture is spread evenly and right out to the edges and then pop the trays into the oven for around 4-6 minutes. I found that I was getting carried away spreading the mixture onto the discs and almost forgot a couple of times that I had them in the oven so make sure you keep an eye on them because they can go from not-quite-ready to I've-stuffed-the-whole-thing very quickly! Once they're golden brown, remove them from the oven and cool on a wire rack then repeat until you've got 8 big biscuits.

Once the biscuits have all cooled (it won't take long) you can put it all together! For the filling, whip 600ml of cream until soft peaks form and then gently fold through 175g lemon curd. You can just use store bought stuff but I made my own - it's really easy. Just pop 2 whole eggs, 2 egg yolks, 3/4 cup caster sugar into a saucepan and whisk them together. Then add 1/3 cup chilled unsalted butter and the zest and juice of 2 lemons and whisk over a low heat until it boils and thickens. Place one biscuit on a plate and spread with 1/2 cup of the lemon cream filling. Top with another biscuit and repeat until all the biscuits are used, finishing with a layer of the filling. Pop it into the fridge to set overnight.

Then we make a lovely lemon syrup to go over the top! Peel 1 lemon and cut the rind inro thin strips. Juice the lemon. Place the rind in a saucepan, cover with boiling water, bring to the boil and drain. Repeat this another two times. Place the drained rind into the saucepan and add 1/2 cup caster sugar, the lemon juice and 1/2 cup water. Stir over medium heat until the sugar dissolves, turn the heat up to high and boil for 2-3 minutes or until the syrup thickens. Set aside to cool and then pour over the cake.

And you're done - enjoy!

Sunday, April 3, 2011

Muffins and more muffins

It was back to basics in the kitchen today. I had a thumping headache but I'd planned to make some muffins - some for me and some to pop in the freezer for Claire to take back to uni next time she comes home - and thought it an easy enough task. As I'd expected, the measuring, mixing, and sugary smells coming from the oven were all I needed to shift the headache and the dread of the weekend ending.

Double Choc Chip and Apple Crumble muffins - simple but delicious!
I have a real love of baking muffins. They're so easy but so satisfying and I've been baking them forever. I'm sure that my first ever cookbook was a Family Circle 'Muffins' book from my beautiful Nanny. Over time I've tried all sorts of different muffin recipes but I don't think you can go past the classics which is why I chose these ones today - double choc chip and apple crumble.

THE RECIPES
From my experience, pretty much all muffins are made the same. You mix together the dry ingredients, make a well, pour the wet ingredients in and mix until just combined. So, dry ingredients first...

Double Choc-Chip
1 and 3/4 plain flour
1/2 cup sugar
1/4 cup cocoa
1 tbsp baking powder (I was a bit alarmed at this big amount but it all turned out ok!)
1/2 tsp salt
3/4 cup choc chips (a. I used dark choc chips b. the recipe said 1/2 a cup but...!)

Apple Crumble
1 cup plain flour
3/4 cup caster sugar
1/2 tsp cinnamon
1/2 tsp bi-carb soda

Mix it all together, make a well in the middle and then add the wet ingredients and mix until just combined (overmixing will leave you with tough muffins and nobody wants that!)

Double Choc-Chip
2 eggs
1/2 cup vegetable or canola oil
1 cup milk
1 tsp vanilla extract

Apple Crumble
2 eggs
1/2 cup vegetable or canola oil
1 tsp vanilla extract

The choc chip ones are ready for the oven now. Divide the mixture amongst the cases in a 12-hole muffin tin and put them into the oven at 180c.

For the apple crumble muffins you'll need to peel and chop two medium sized apples and stir them through. Divide the mixture amongst cases in a 12-hole muffin tin and top them with the crumble mixture. To make the crumble you just need to put a 1/3 cup plain flour, 1/2 tsp cinnamon, 2 tbsp brown sugar and 30g chilled butter into a food processor and whiz to combine. Then just sprinkle the crumble generously over the 12 muffins and slide the tray into the oven.

Both of the trays will need about 20 minutes. Use a cake tester just to be sure.

And it's as easy as that!

Wednesday, March 30, 2011

Raspberry Ganache Cake

So first things first. This little gem comes from one of my fav baking blogs 17 and Baking. Make sure you check it out - this girl is a whiz! And I know... berries and chocolate again but can you blame me!?

Oh. My God.
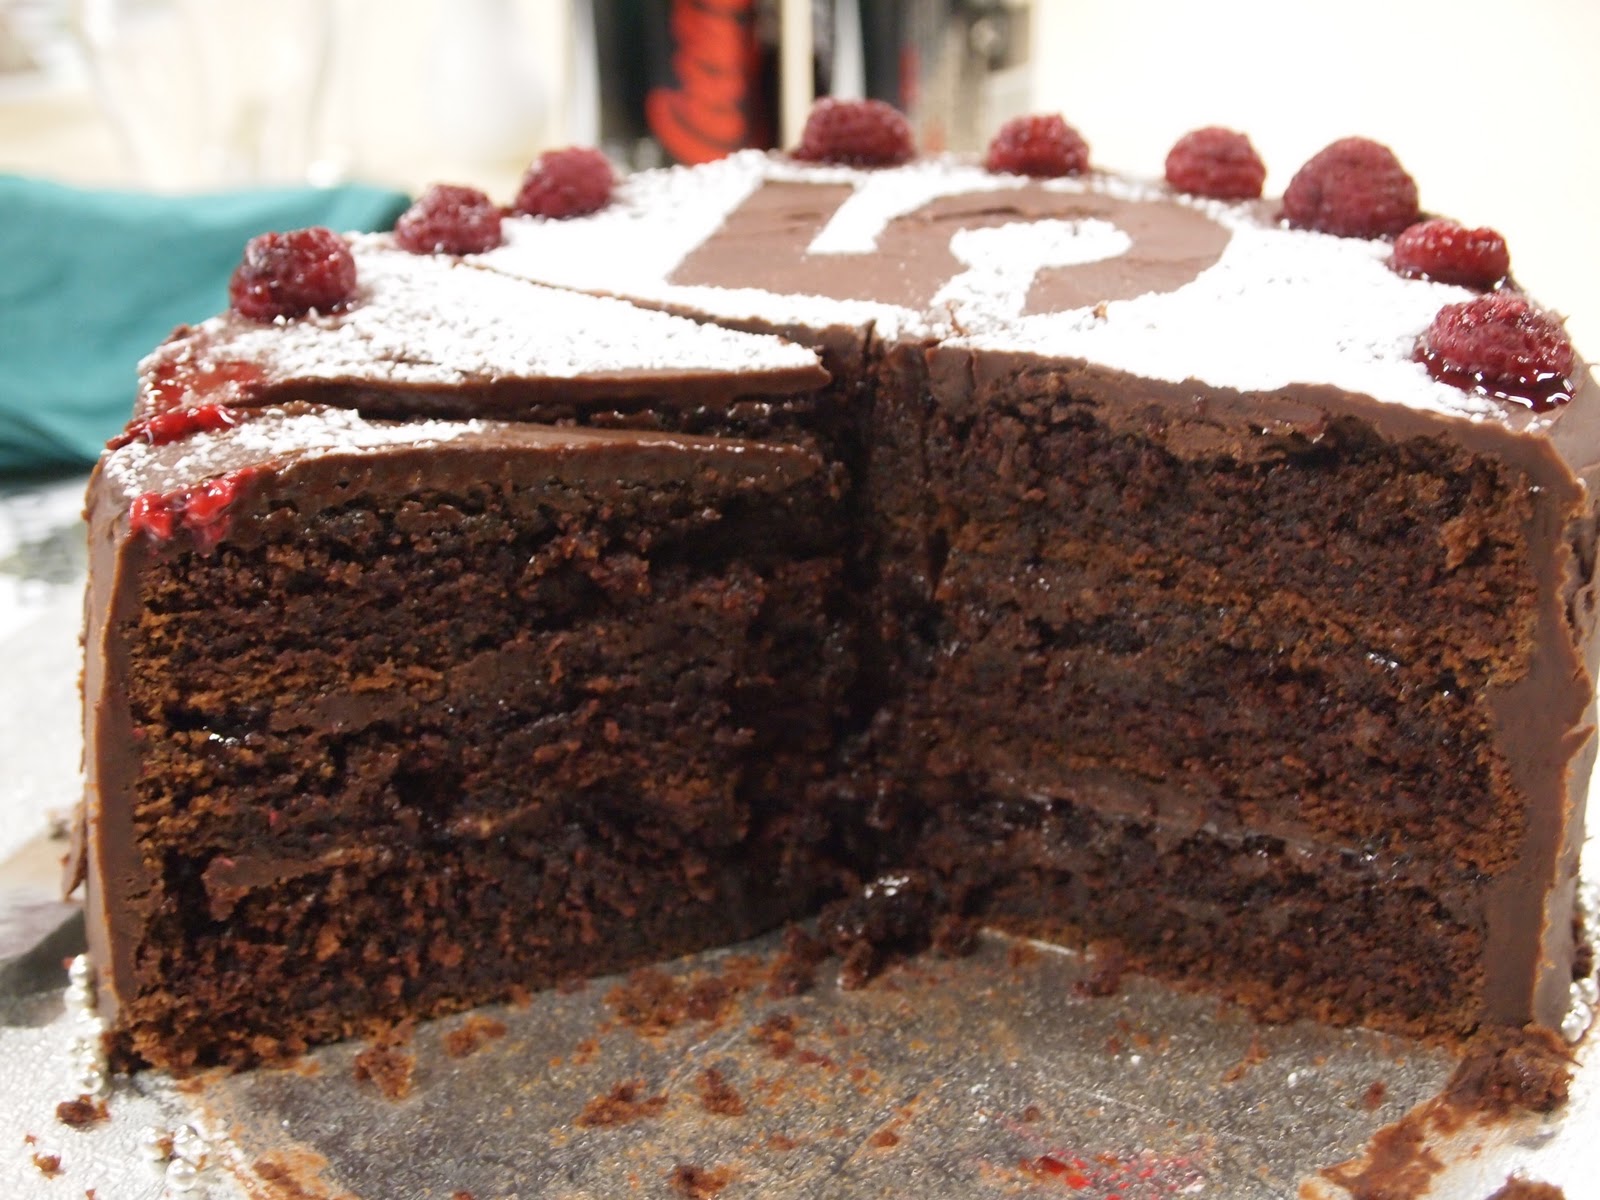
Dad's workmate Chips has been working for him for 25 years this year - a pretty awesome feat- so we decided to chuck him a bit of a do (not a surprise one like we did for his 20 years... not sure that went down too well!) on Friday night. I had the day off work after going to the footy the night before (go the blues!) and realised at about 3pm that Mum hadn't organised the cake that she said she was going to. I was stoked because it gave me an excuse to have a go at this beautiful cake that I'd been eyeing off for weeks!


I cut out the numbers in cardboard, sat them on top and dusted with icing sugar.
I didn't have a lot of time so it was a quick but cute way to decorate it!
 The recipe is massive and Elissa explains it perfectly on her blog so I'll let you get it from there but I do have some hints/tips/learnings from this baby:
  • Elissa isn't joking when she says in the recipe that the cakes are soft. You have to be so so careful with them. I handled them really gently and still ended up with each of them in about three pieces! It doesn't matter once you put it all together but it does make things a bit tricky.
  • I only had just enough cocoa so I lined the entire tins with baking paper and then buttered them again and sugared them.
  • I only had olive oil so I used that and it seemed to work out ok.
  • It is incredibly rich so you'll only need tiny slices for everyone (unless you're a chocaholic like me - I could have eaten the whole thing!) 
It's a bit of work but so worth it. Keep this one in mind for the next special occasion you've got coming up - nobody will be disappointed!